We use cookies to give you the best experience on our website. These cookies are completely safe and secure and will never contain any sensitive information. Please read our Privacy Policy. By clicking "Ok" or clicking on any other content, you agree that cookies can be placed.
Flower Prints
Introduction
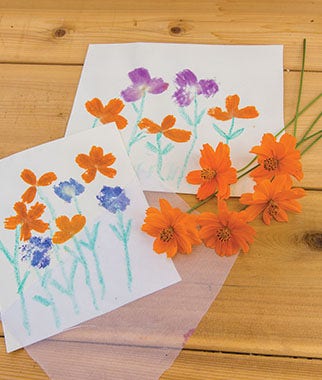
Plants have been used for thousands of years to make dyes. If you have ever had grass stains on your knees you have seen that pigments in plants can be released. In this project you will squeeze the pigments out of the plants to make flower prints. The result will give the flower shape with soft edges, almost like an impressionist painting. You may be surprised by the results, as the prints may not always be the same color as the petals.
________________________________________________________________________________________
What You Need:
- Craft mat or newspaper to protect your work service.
- Watercolor or mixed media paper.
- A piece of fine polyester knit interfacing, do not use fusible, it should be thin enough to see through.
- A variety of brightly colord flower petals. Roses, marigolds, calendula, cosmos, dianthus or pansies are perfect.
- A sheet of plastic to hold the project together
- A popsicle or craft stick to release the pigment (the side of a spoon works as well)
- Colored pencils or crayons to finish the pictures
________________________________________________________________________________________
What To Do:
- Pick a variety of flowers in the morning after the dew has dried. Place the stems in a bucket of water to keep fresh.
- Work on a craft mat to protect your work surface, the pigments in the flowers can stain.
- Place your art paper on the surface and place the polyester knit interfacing on top. The polyester interfacing will make it easy to remove the leftover petals.
- Arrange a few petals to make a design. The top surface of the petal, which is the brightest part, should be face down on the polyester. It is best to work in one small area at a time.
- Cover the flower petals with the clear plastic taking care not to move the petals.
- Starting in thte center use the craft stick to rub the petals into the fabric. You want to press the petals from the center and work to the edges. The moisture and pigment will extrude through the polyester and onto the art paper. The petals will change color. It can take a couple minutes of rubbing to get all the moisture out.
- Carefully pull up the fabric to check on your design. Notice the intensity and the colors are different from the original petal.
- Remove the plastic and fabric to reveal your design. Notice the intensity and the colors are different from the original petal.
- Scrape off the leftover petals in the fabric and choose a new spot to work with a clean part of the fabric
Once your picture is finished let it dry. When it is dry, draw in leaves and stems or other designs to complete your picture. The polyester fabric can be washed and dried and reused. If you keep the picture out of direct sun it will last for several years. With a little practice you can make cards and tags and many other pictures using this simple technique.